A NodeJS API structure
Working within the NuxtJS framework over the last year, I've found several patterns that are serving me very well. When I look back at my first foray into NodeJS and building APIs, it's a little scary to see how convoluted that first project was - but with a little planning, it's possible to create a very simple and maintainable structure.
In this article, I'm going to go through how I build out the server-middleware folder in my NuxtJS projects. I typically build an API layer like this for two reasons:
It allows me to develop and test on any server without having to enable CORS - all the API calls are server-server, so CORS is not an issue. In many of my projects I'm dealing with legacy systems where I don't have the access to enable CORS.
Again - as I'm dealing with legacy systems, this allows me to create custom handlers for each API call - I try to avoid transforming data in the server-middleware layer as much as possible, but there have been cases where I've even had to incorporate multiple API calls into this layer, which is then presented to my client layer as a single API call, because of shortcomings in the business logic of the backend.
So - let's take a look at how this all builds up:
Setting up the project
First off - enable the server-middleware in your NuxtJS project and set the folder that will hold your middleware APIs. In this case, we are going to create an API path called /nuxtapi/
nuxt.config.js
export default {
serverMiddleware: ["~/server-middleware/nuxtapi/index.js"],
}
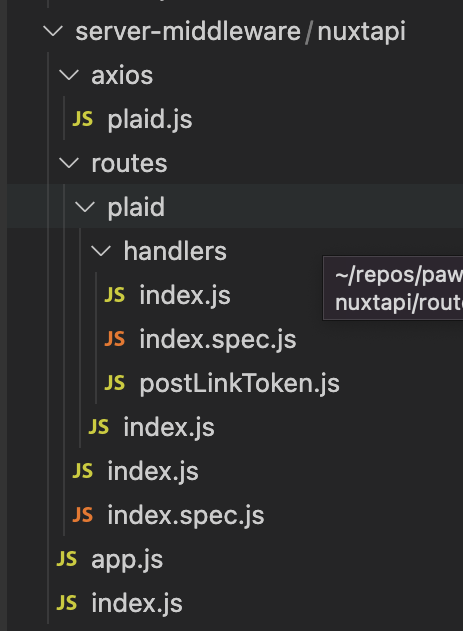
Next we start building out the architecture in the server-middleware folder. It can seem a lot for just one endpoint, but using this framework makes it really easy to add future endpoints to one or multiple services.
First we need to create /server-middleware/nuxtapi/app.js to setup the basic express instance. In this case, we're also going to include the file-upload library, as I'm pretty sure we'll be allowing for manual account files to be uploaded in addition to the Plaid connection.
Nothing very magical here - and if you're used to using NodeJS with Express - pretty simple!
app.js
const express = require("express");
const fileUpload = require("express-fileupload");
const app = express();
app.use(express.json());
app.use(
fileUpload({
debug: false,
preserveExtension: true,
})
);
module.exports = app;
Next we build server-middleware/nuxtapi/index.js - this one starts to automatically build the routes that we want to offer.
In the function getBaseRoutes(), we scan through all the folder entries in the ./routes folder and create a new route for each one. This file should never need you to touch it again
index.js
const fs = require("fs");
const path = require("path");
const app = require("./app");
const routes = require("./routes");
app.all("*", (req, res, next) => {
/* eslint-disable no-console */
console.log(`Hitting ${req.method} API`, req.url, req.headers.host);
next();
});
for (const route of getBaseRoutes()) {
console.log("Route", route);
app.use(`/${route}`, routes[`${route}Routes`]);
}
module.exports = {
path: "nuxtapi/",
handler: app,
};
function getBaseRoutes() {
const source = path.join(__dirname, "./routes");
return fs
.readdirSync(source, { withFileTypes: true })
.filter((dirent) => dirent.isDirectory())
.map((dirent) => ${dirent.name});
}
Next we need two folders. ./routes and ./axios - the first will contain all of the routes that we want to offer, and the second will contain all of the axios configurations. Typically, each service that your project needs to connect to will use a slightly different axios configuration - a different basepath, a different timeout or maybe some different authentication headers. This gives a simple way to control that and keep the configuration separate between services - be careful not to store credentials on your github repo though!
This axios file sets up the configuration for my Plaid connection endpoint:
axios/plaid.js
import { plaid } from '../../../config'
const axios = require('axios')
const instance = axios.default.create({
baseURL: ${plaid.baseurl}/,
timeout: 30000
})
module.exports = instance
This index file automatically builds up the routes object, based on the various routes laid out in the folder structure.
routes/index.js
const fs = require('fs')
const path = require('path')
const routes = {}
for (const route of getBaseRoutes()) {
routes[`${route}Routes`] = require(`./${route}`)
}
module.exports = { ...routes }
function getBaseRoutes () {
const source = path.join(__dirname, '.')
return fs
.readdirSync(source, { withFileTypes: true })
.filter(dirent => dirent.isDirectory())
.map(dirent => ${dirent.name})
}
Now we get into the actual routes. For each route, we need an index file and a folder of handlers. Let's take a look at the first endpoint call for Plaid - get the Link token:
This index file builds the router object, based on the defined handlers
routes/plaid/index.js
const { Router } = require("express");
const handlers = require("./handlers");
const router = Router();
for (const key of Object.keys(handlers)) {
switch (key.substring(0, 2)) {
case "ge":
router.get(`/${key}*`, handlers[key]);
break;
case "pu":
router.put(`/${key}*`, handlers[key]);
break;
case "po":
router.post(`/${key}*`, handlers[key]);
break;
case "pa":
router.patch(`/${key}*`, handlers[key]);
break;
default:
console.log("Unknown verb");
continue;
}
}
module.exports = router;
And here is the handlers folder... The index.js file automatically adds all the handlers that are listed in this folder.
routes/plaid/handlers/index.js
const fs = require('fs')
const path = require('path')
const compts = {}
for (const compt of getBaseRoutes()) {
compts[`${compt}`] = require(`./${compt}`)
}
module.exports = { ...compts }
function getBaseRoutes () {
const source = path.join(__dirname, '.')
return fs
.readdirSync(source, { withFileTypes: true })
.filter(dirent => dirent.isFile())
.filter(dirent => !(dirent.name.includes('index') || dirent.name.includes('spec')))
.map(dirent => ${dirent.name.substring(0, (dirent.name.length - 3))})
}
Finally - we add a specific handler for the endpoint and HTTP verb that we need. The naming of this file IS important - for example, a POST endpoint must be named like 'postXXX.js' so that it gets added as a POST route to Express.
In this case, this is the middleware that calls Plaid to get a link token - this token is later converted to an access token with a separate call - but that's for another article!
routes/plaid/handlers/postLinkToken.js
const axios = require("../../../axios/plaid");
module.exports = (req, res, next) => {
const uri = 'link/token/create';
axios
.post(uri, req.body)
.then((response) => {
res.status(response.status).send(response.data);
})
.catch((error) => {
/* eslint-disable no-console */
if (error.response) {
console.log(error.response)
res.status(error.response.status).send(error.response.data);
} else {
res.status(500).send(error);
}
});
};
- Author: Gary Bailey
- Created: Jan, 30 2022
- Updated: Feb, 07 2022